
Welcome to the world of blockchain development! If you’re eager to start creating decentralized applications, you’ve come to the right place. This tutorial will guide you through building a simple dApp on the Tezos blockchain using React and @Taquito/taquito. Even if you’re a beginner, we’ve got you covered — we’ll take things at a comfortable pace to ensure that you understand everything. By the end of this tutorial, you’ll have a fully functional dApp that you can be proud of.
Please note that this tutorial is tailored for new Tezos developers, so please be patient with us as we go through the steps. While we won’t go into React in-depth, we’ll provide all the information you need to start. Additionally, we’ll skip over certain best practices for the sake of simplicity. Finally, you won’t need to spend any money using test funds to interact with the testnet, so you don’t have to worry about costs.
Before we get started, quick disclaimers
- Protecting your mnemonic and secret keys is paramount in web3. These are your private details and should never be disclosed, except when re-instantiating a previous wallet. When pairing with existing wallets like Temple Wallet or Kukai Wallet, you may be required to share your sensitive data, but you should still keep it private from third parties. Open-source wallets like these expose their code for transparency and validation, but you should never give your secret key/mnemonic to dApps that request it. Instead, only trust known wallet providers with your vulnerable data. To minimize risk during development, it’s best practice to use test secret keys/mnemonics, where non-testnet funds cannot be lost. For more information on keeping your secrets safe, click here.
- This is not a true dApp because it doesn’t use a Smart Contract. A true dApp with a smart contract will come soon!
Summary
In this tutorial, we will create a dApp that facilitates the transfer of Tez from one implicit account to another. To accomplish this, we will integrate a wallet provider named Beacon Wallet with Taquito. With this setup, transferring Tez between accounts becomes more streamlined and hassle-free.
Taquito simplifies the various steps involved in creating the transaction operation, estimating the operation’s costs, forging the bytes of the operation, and confirming the transaction’s success with the chain. By the end of this tutorial, you will be able to transfer Tez with ease and confidence, thanks to the power of Taquito and Beacon Wallet.
Things you will need:
- A computer 👀
- Basic setup for TypeScript/JavaScript development
- Crypto wallet:
- Temple Wallet (will be using) or Kukai Wallet
So let’s get started!
For clarity, I will put placeholders for variables with <\some variable> where the <\> will not be included and will show what I will use for my variables throughout. As well as some comments in react contained in {/**/} and our normal // for TS/JS comments.
It will also be expected that your computer is already set up for NodeJS development.
I suggest using the Node version lts/gallium or lts/hydrogen.
Creating a React app
First, we will need to create a react app. Pick a directory you would like the have the app contained.
npx create-react-app <\your app name\> --template typescriptHere is mine.
This will create a new directory with the name simplest-dapp.
npx create-react-app simplest-dapp --template typescriptNow would be a good time to open your project directory in your Code Editor.
Installing Dependencies
Next, we will need to install some dependencies.
Navigate into the root directory of your project cd <\dapp directory name>. Mine would be something like cd ~/code/dapps/simplest-dapp/
npm install --save @taquito/taquito @taquito/beacon-wallet bufferDocs can be found here at @taquito/taquito and @taquito/beacon-wallet.
Next, we will need some dev dependencies.
This will include some packages that may not be needed but are to avoid potential problems from working with web3 tools in browsers. Some Node native dependencies don’t always play nice with browsers. Example: Buffer is native to Node but is not native to browsers and will need to be installed as a separate dependency.
Problem avoiding dev dependencies:
npm install --save-dev assert crypto-browserify https-browserify os-browserify process react-app-rewired stream-browserify stream-http urland add a file config-overrides.js with
const webpack = require('webpack');
module.exports = function override(config) {
    const fallback = config.resolve.fallback || {};
    config.ignoreWarnings = [/Failed to parse source map/];
    Object.assign(fallback, {
        "crypto": require.resolve("crypto-browserify"),
        "stream": require.resolve("stream-browserify"),
        "assert": require.resolve("assert"),
        "http": require.resolve("stream-http"),
        "https": require.resolve("https-browserify"),
        "os": require.resolve("os-browserify"),
        "url": require.resolve("url")
    })
    config.resolve.fallback = fallback;
    config.plugins = (config.plugins || []).concat([        new webpack.ProvidePlugin({
            process: 'process/browser',
            Buffer: ['buffer', 'Buffer']
        })
    ])
    return config;
}
— Quick Reminder to save your files 🫠—
You will also need to modify some files.
in your package.json, you will need to change your scripts to react-app-rewired
"scripts": {
    "start": "react-app-rewired start",
    "build": "react-app-rewired build",
    "test": "react-app-rewired test",
    "eject": "react-scripts eject"
  },
For ease of styling, we will install Tailwindcss, although we need to follow the standard mobile displays first, then the larger convention. We will do some simple styling. Please feel free to change the styling as you’d like! This is very rudimentary styling used. Install steps and docs can be found here
In short, installation and set-up will be…
npm install -D tailwindcss
npx tailwindcss init
npx tailwindcss init will add a tailwind.config.js to your root directory. Change it to look something like this:
/** @type {import('tailwindcss').Config} */
module.exports = {
  content: [    "./src/**/*.{js,jsx,ts,tsx}",
  ],
  theme: {
    extend: {},
  },
  plugins: [],
}
Remove everything inside index.css in your src directory to have
@tailwind base;
@tailwind components;
@tailwind utilities;
#root {
  height: 100%;
  width: 100%;
  display: flex;
  flex-direction: column;
  align-items: center;
  justify-content: center;
}
html {
  height: 100%;
  width: 100%;
}
body {
  height: 100%;
  width: 100%;
}
Now you can start styling with tailwindcss.
Creating your Crypto Wallet
If you already have one, you can skip this aside for making your custom ghostnet endpoint if needed.
If you plan on using Temple Wallet, we will need to add a custom endpoint for the ghostnet testnet we plan on using.
Ideally, you will have the Chrome Temple Wallet extension and have created a wallet. The browser extensions can be found here — also, a guide with the steps to create your software wallet.
- Open and put in your password for your temple wallet.
- Click the icon beside your wallet name.
- Click Settings
- Click Networks
- Enter a name for the network and add the URL
[https://ghostnet.ecadinfra.com](https://rpc.ghostnet.teztnets.xyz)https://rpc.ghostnet.teztnets.xyz
Enough setup. Let’s start coding.
Starting your dApp
We should be able to start our dApp within the root directory of our project. Running npm run start will start your dApp and should run on the port specified in the terminal (default localhost:3000).
If the app crashes, you can kill and restart it. However, this should be self-reloading and handle all changes itself.
Writing the dApp
Now, let’s define the variables and states that we will need.
Variables:
- network
- defaultMatixNode
states:
- loading
- error
- walletInitialized
- pkh
- balance
- receiverPkh
- receiverBalanceBefore
- receiverBalanceAfter
- amount
- wallet
- Tezos
let’s import what we will need inside of our App.tsx
we can replace everything in the App.tsx file to have the following:
import { useState } from 'react';
import { BeaconWallet } from '@taquito/beacon-wallet';
import { NetworkType, Regions } from "@airgap/beacon-types";
import { TezosToolkit } from '@taquito/taquito';
function App() {
  const network = 'https://ghostnet.ecadinfra.com';
  const defaultMatrixNode = "beacon-node-1.sky.papers.tech";
  // Basic states
  const [loading, setLoading] = useState<boolean>(false);
  const [error, setError] = useState<unknown>();
  const [walletInitialized, setWalletInitialized] = useState<boolean>(false);

  // Account Information
  const [pkh, setPkh] = useState<string>('');
  const [balance, setBalance] = useState<number>(0);
  // Receiver Information
  const [receiverPkh, setReceiverPkh] = useState<string>('');
  const [receiverBalanceBefore, setReceiverBalanceBefore] = useState<number>(0);
  const [receiverBalanceAfter, setReceiverBalanceAfter] = useState<number>(0);
  // Amount to send
  const [amount, setAmount] = useState<number>(0);
  // Hold Wallet and TezosToolkit instances
  const [wallet] = useState<BeaconWallet>(new BeaconWallet({ name: "Simple Transfer dApp", preferredNetwork: NetworkType.GHOSTNET, matrixNodes: { [Regions.NORTH_AMERICA_WEST]: [defaultMatrixNode] } }));
  const [Tezos] = useState<TezosToolkit>(new TezosToolkit(network));
  return (
    <>
      {/* dApp html*/}
    </>
  );
}
export default App;
Our Tezos state and wallet state will not need to be changed after set, but we would like them to reset between hard refreshes so they will be used as useState rather than something like useMemo
As shown above, Beacon Wallet will be initialized with a name, network and region. These must be changed if you want to use a different network.
Tezos (our TezosToolkit Instance) will need to be set up using the same network that the wallet will be set up with
Now, let’s make some helper functions within our src directory. Create a file called helperFunctions.ts.
Again, for simplicity’s sake, we will just be using useStatein this simple dApp.
pkh for those new to Web3 stands for Public Key Hash, which in Tezos Secret Keys have a corresponding Public Key and Public Key Hash.
If you are not using Typescript, you can ignore the types.
Helper functions
To keep the App.tsx a little cleaner, let’s put some helper functions here to handle requesting wallet permissions, clearing the wallet and converting mutez to tez.
Inside our helperFunctions.ts, let’s add the following code of our imports and our helper functions:
Imports needed:
import { BeaconWallet } from "@taquito/beacon-wallet";
import { NetworkType } from "@airgap/beacon-types";
Functions:
export const activateWallet = async (wallet: BeaconWallet): Promise<BeaconWallet> => {
  const permission = await wallet.client.requestPermissions({ network: { type: NetworkType.GHOSTNET }});
  if (!permission.address) {
    throw Error("Permission denied")
  }
  return wallet;
}
// 1 tez === 1000000 mutez
export const mutezToTez = (mutez: number): number => {
  return mutez / 1000000;
}
Let’s break this down a bit. wallet (BeaconWallet) .client.requestPermissions... will prompt the user to connect their wallet to the dApp.
.client.clearActiveAccount will clear the current session. Reloading our web page and grabbing a previously active account will be out of the scope of this article.
We will leave one function to handle the sending of tez inside our App.tsx so that we don’t have to worry about passing multiple props to set state. We will also need to import those helper functions.
Add the helper function imports next to the other imports inside App.tsx, and then let’s add this function below the states we added previously.
// other imports
import { activateWallet, mutezToTez } from './helperFunctions';
// function App
// states
const sendTez = async () => {
  // reset receiver balance after for second transfers
  setReceiverBalanceAfter(0);
  try {
    // Get the Initial Balance of the Receiver
    const receiverInitialBalance = (mutezToTez((await Tezos.rpc.getBalance(receiverPkh)).toNumber()));
    setReceiverBalanceBefore(receiverInitialBalance);
    // send Tez to another account
    const transaction = await Tezos.wallet.transfer({ to: receiverPkh, amount: amount, mutez: true}).send();
    setLoading(true);
    // await confirmation from the chain
    await transaction.confirmation(); // If the operation wasn't confirmed, it throws an error
    //When confirmation is completed, we can set loading to false because the operation succeeded
    setLoading(false);
    // Update balance of sender
    const senderPkh = await Tezos.wallet.pkh()
    setBalance(mutezToTez((await Tezos.rpc.getBalance(senderPkh)).toNumber()))
    // Update the balance of the receiver after confirmation of the transaction
    const receiverFinalBalance = (mutezToTez((await Tezos.rpc.getBalance(receiverPkh)).toNumber()));
    setReceiverBalanceAfter(receiverFinalBalance);
  } catch (e) {
    setError(e);
    setLoading(false);
  }
}
// THE REST ...
Creating the HTML
I’ll leave comments as landmarks to see where we will add code.
Connect your wallet and show account information
First, let’s change the return of the function App in App.tsx to
  return (
    <>
    {/* dApp html */}
    <div className='h-full w-full bg-sky-200'>
      {/* TITLE SECTION */}
      <div className='flex flex-col justify-center items-center w-full md:justify-between md:items-start pt-10 px-10 absolute md:flex-row'>
        <div className='bg-orange-100 rounded-md p-4 w-fit h-fit mb-4 md:mb-0'>
          <h1 className='text-xl text-sky-900 font-extrabold'>Simple Transfer dApp</h1>
        </div>
        <div className='bg-orange-100 rounded-md p-4 w-fit'>
          {/* TODO Connect Wallet and Account information */}
        </div>
      </div>
      <div className='h-full w-full flex justify-center items-center'>
        {/* Transaction Interface Container */}
        <div className='bg-orange-100 rounded-md p-4 w-fit flex flex-col items-center'>
          {/* TODO shows only an error if an error */}

        </div>
      </div>
    </div>
    </>
  );
We have different TODOs’ for the places we will add to, as well as more as we continue to add but bear with me.
{/* TODO Connect Wallet and Account information */}
Here we create a button that will prompt your Temple Wallet to request a connection between your temple wallet extension and your dapp. When the button is clicked, you will be prompted to enter your password and connect your wallet. Now would be a good time to do that if you still need to create your wallet.
After, we will add a wallet provider to our Tezos state (TezosToolkit instance).
And Finally, get and set our PKH and balance states
            {/* TODO Connect Wallet and Account information */}
            {!walletInitialized ?
              <div className='flex flex-col items-center'>
                <button className='border border-sky-400 rounded-md bg-sky-100 px-2' onClick={async () => {
                  const activeWallet = await activateWallet(wallet);
                  Tezos.setWalletProvider(activeWallet);

                  const getPkh = await activeWallet.getPKH();
                  setPkh(getPkh);

                  const getBalance = await Tezos.rpc.getBalance(getPkh);
                  setBalance(mutezToTez(getBalance.toNumber()));

                  setWalletInitialized(true);
                }}>Connect your wallet</button>
              </div> :
              <div className='flex flex-col items-center'>
            {/* TODO show wallet account information */}
            </div>
          }
          {/* THE REST */}
You should be able to connect your wallet. However, we still have some work to see our account information.
              {/* TODO show wallet account information */}
              <p>Connected</p>
                <p>your pkh is: {pkh}</p>
                <p>your balance is: {balance}ꜩ</p>
                <button className='border border-sky-400 rounded-md bg-sky-100 px-2' onClick={async () => {
                  await wallet.client.clearActiveAccount();
                  setWalletInitialized(false);
                  setPkh('');
                  setBalance(0);
                }}>Disconnect</button>
                {/* closing div */}
              </div>
Now you can try Connecting your wallet and should get back a PKH and a balance. If you still need to connect your wallet. Click the button that we created on your web page. It should be in the top right corner if everything has yet to burn down. As mentioned, you should be prompted to enter your password and connect your wallet. If you have already connected your wallet before, it may skip asking for the password (normal, so don’t be alarmed 🙃).
Don’t worry if your wallet has no balance. Copy your PKH, and let’s fund it from the testnet funder. All testnets can be found here if you choose a different testnet.
Creating the transfer Container
We’ll create a feature that captures and displays any errors encountered. This can be achieved by adding the code following this comment {/* TODO shows only an error if an error */}. As well as a simple button to reset the error to try again.
          {/* TODO shows only an error if an error */}
          {error ?
            <>
              <pre className='flex flex-col justify-center items-center'>
                <code>{JSON.stringify(error, null, 4)}</code>
                <button className='border border-sky-400 rounded-md bg-sky-100 px-2 w-fit' onClick={() => setError(undefined)}>reset</button>
              </pre>
            </> : <p>Please connect your wallet</p>
          }
Now let’s continue with another ternary operator to handle if the wallet is connected.
This will be a ternary after the : in the error ternary before the <p>Please connect your wallet</p>
            </> :
              // The rest of the error ternary
              // show only if a wallet is initialized and there is no error
              walletInitialized ?
                <>
                  <h1 className='text-lg'>Transfer Tez</h1>
                  <label>Receiver:</label>
                  <input type="text" className='w-4/5 text-center border border-sky-400 rounded-md bg-sky-100 mb-2' onChange={(e) => {setReceiverPkh(e.target.value)}} />
                  <label>Amount in Mutez (1 Tez = 1000000 Mutez):</label>
                  <input type="number" min={0} className='w-4/5 border text-center border-sky-400 rounded-md bg-sky-100 mb-2' onChange={(e) => {setAmount(Number(e.target.value) ? Number(e.target.value) : 0)}} />
                  {/* TODO button or loading */}
                  <p className='pt-2'>test receiver:</p>
                  <p className='pt-2'>tz1RugwuGQsNDRUtP2NZmtXCsqL7TgpXh2Wo</p>
                  {/* TODO add balance before and after */}
                </> :
                // Prompt to connect wallet if not initialized
                <p>Please connect your wallet </p>
            }
Great! So, now we have our inputs for our PKH and our tez that we want to send (in mutez: 1 mutez = 0.000001 tez)
I’ve also included a test pkh that can be used as the receiver tz1RugwuGQsNDRUtP2NZmtXCsqL7TgpXh2Wo but feel free to get another pkh to use as a receiving address!
Now let’s finally use our sendTez function and test out a transaction.
                  {/* TODO button or loading */}
                  {!loading ?
                    <button className='border border-sky-400 rounded-md bg-sky-100 px-2' onClick={sendTez}>Send</button> :
                    <p className='border border-sky-400 rounded-md bg-sky-100 px-2'>loading...</p>
                  }
                  {/* the rest */}
We have a simple loading state to ensure we don’t make multiple transactions.
Now we have working transactions that can be run.
But we can do better than that. Let’s make use of our last two states and display the receiver balance before and after the transaction following the {/* TODO add balance before and after */}
                {/* TODO add balance before and after */}
                  {receiverBalanceBefore ?
                    <p className='pt-2'>receiver balance before: {receiverBalanceBefore}ꜩ</p> :
                    <></>
                  }
                  {receiverBalanceAfter ?
                    <p className='pt-2'>receiver balance after: {receiverBalanceAfter}ꜩ</p> :
                    <></>
                  }
                  {/* the rest */}
If you haven’t done it already, send some tez! If your wallet is connected, enter a PKH, some tez and press send! The input for tez is in mutez, which has to be done in whole numbers (reminder: 1 tez = 1000000 mutez).
To test another transfer, keep track of your account balance (top right) before and after sending. If you send 1 mutez, you will find that more funds are taken due to the different fees involved when interacting with the chain. Specifically, there will be a gas fee of roughly 0.0004 tez for your 1 mutez transfer. This is why it’s not worth sending 0.000001 tez (1 mutez), which would cost you 0.000401 tez. 😅 However, this is what testing is for.
After all this, we should have a working dApp running on the Ghostnet testnet and, depending on your styling liberties, something similar to the following.
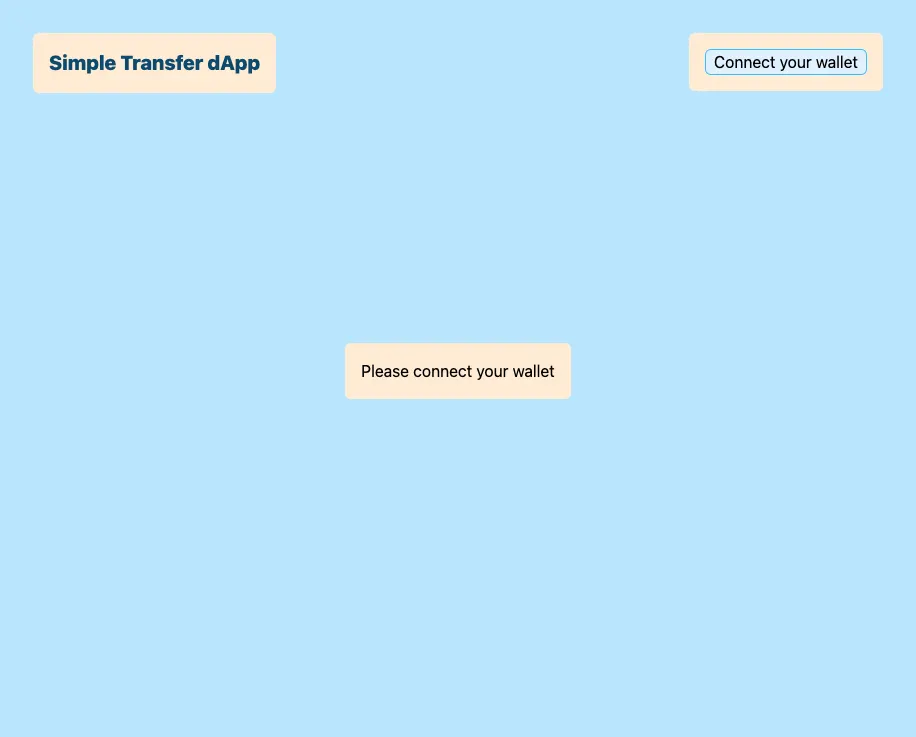
Congratulations! You’ve completed your first dApp, and this is just the beginning of an exciting journey full of new challenges and opportunities. You established a seamless connection to a wallet provider by utilizing Beacon Wallet and successfully injected an operation into the chain. As a result, you retrieved the updated balances of both the sender and receiver addresses. Well done! The next challenge will be to create a dApp with a smart contract that will be interacted with and the storage of the smart contract influenced.
The repository with my copy of the code can be found here.
Dependencies when making this dApp complete list
  "dependencies": {
    "@taquito/beacon-wallet": "^16.1.2",
    "@taquito/taquito": "^16.1.2",
    "@testing-library/jest-dom": "^5.16.5",
    "@testing-library/react": "^13.4.0",
    "@testing-library/user-event": "^13.5.0",
    "@types/jest": "^27.5.2",
    "@types/node": "^16.18.24",
    "@types/react": "^18.0.38",
    "@types/react-dom": "^18.0.11",
    "react": "^18.2.0",
    "react-dom": "^18.2.0",
    "react-scripts": "5.0.1",
    "typescript": "^4.9.5",
    "web-vitals": "^2.1.4"
  },
  "devDependencies": {
    "assert": "^2.0.0",
    "buffer": "^6.0.3",
    "crypto-browserify": "^3.12.0",
    "https-browserify": "^1.0.0",
    "os-browserify": "^0.3.0",
    "process": "^0.11.10",
    "react-app-rewired": "^2.2.1",
    "stream-browserify": "^3.0.0",
    "stream-http": "^3.2.0",
    "tailwindcss": "^3.3.1",
    "url": "^0.11.0"
  }
(If you wish to deploy this dApp, certain devDependencies may need to be installed as dependencies, such as buffer, which is not native to browsers.)