
One of the most interesting features of smart contracts is that they can grant intricate access permissions to their users. Smart contract developers can allow anyone to use their contracts or they can set up conditions as to who has access to certain features of the contracts. One of the easiest ways to do that is to hardcode the conditions that have to be met in order to allow a particular user to call a specific feature of the contract, for example by using the Michelson instruction **IF** .
However, you may also want to give your users the ability to allow or reject a certain transaction by saving it into a bigmap in the contract for later reference. This is what permits outlined in the TZIP-17 standard do. In a nutshell, permits approve transactions in advance and record these approvals in a contract for later processing by third parties.
Although permits can be a little tricky to implement, they are a powerful tool to dynamically authorize transactions in advance. In this article, you will learn more about the standard and how you can implement permits on the contract level with Ligo, but also how you can create a permit with Taquito.
Note: the first part of this article is an oversimplification of how TZIP-17 works in order to make this information accessible to a wider audience. If you are interested in the intricacies of permits on Tezos, you should check the official documentation. The second and third parts require basic knowledge of Ligo and TypeScript to understand the implementation of permits in these two languages.
The TZIP-17 standard
A simple example
One of the main obstacles to Tezos adoption (and to adoption on any blockchain for that matter) is that new users must get XTZ in order to interact with the blockchain. This necessary step requires them to open an XTZ account and buy coins from an exchange or other means. However, some services may want to let their users interact with the Tezos blockchain in a simpler and faster way. For example, users may want to use tokens living on the Tezos blockchain (like PLENTY or kUSD) without going through the trouble of getting XTZ first and swapping them for the token of their choice.
In such a scenario, a third-party service could manage the tokens of their users by asking them to provide “permits”, i.e to presign transactions involving the transfer of the token in question that the third-party service could then inject (and pay the associated fee) in order to complete the action intended by the user. The interaction could look like this:
- Alice buys 100 xTokens for 100 USD from a third-party service (TPS)
- Alice wants to transfer 50 xTokens to Bob, she forges the transfer transaction, signs it, and provides it as a permit to the TPS
- The TPS records the permit into the xToken contract
- The TPS then injects the operation, pays the associated XTZ fee and 50 xTokens are transferred to Bob from Alice’s account
As you can see, Alice doesn’t need any XTZ as she doesn’t interact directly with the Tezos blockchain and delegates the injection and payment of the transaction to a third party. This is the kind of interaction that permits allow.
Unlike allowances in TZIP-7 or operators in TZIP-12 in this particular case, the user doesn’t allow a certain amount of tokens to be transferred but a whole transaction. In the case of an FA1.2 token, Alice could set a third-party service as an operator and allow the transfer of 50 xTokens to Bob, but a deceitful third party could transfer this amount of tokens to themselves instead of to Bob. The situation gets worse for FA2 tokens where third parties are allowed to transfer any amount they want. Permits make sure that the users allow a whole transaction with all its parameters, not a single parameter of a more complex transaction.
Characteristics of the standard
A permit is nothing but a few parameters packed into bytes associated with the address that allowed them and recorded in a contract. Using a permit generally follows a few steps:
- The parameters of an entrypoint using permits are packed and hashed by the permit submitter.
- The output hash is coupled to 3 other parameters in order to ensure the safety of the permit: the chain ID, the address of the contract and a counter in the contract storage.
- These 4 values are then packed and signed by the user before being submitted to the contract.
- The contract verifies that the provided
tzaddress did sign the permit and records the permit in a bigmap with the associated address. - When the contract receives a transaction to the entrypoint that implements permits, it packs and hashes the parameters and looks for a matching permit. If one is found, the transaction is authorized.
In addition to that, TZIP-17 allows users to set custom expiry dates to their permits. This ensures that a permit is only valid for a certain period of time, after which a transaction that may use it will not be authorized. Custom expiry dates can be set for single permits or for all permits issued by a certain user.
On-chain examples
There are very few contracts currently on mainnet that implement TZIP-17. One of the them is the Quartz FA2 contract from Ubisoft. You can also have a look at the FA2 contract from Rarible.
On hangzhounet, you can find the stablecoin contract originated by TQ Tezos as a demonstration of TZIP-17.
Implementation in Ligo
The implementation in Ligo requires at least 2 steps: first, a special entrypoint must take a permit and other necessary data to verify the permit and record it in the contract. Then, one or multiple entrypoints of the contract pack their provided arguments when a transaction is sent to check if a permit exists for this particular transaction and if the permit is still valid.
The TZIP-17 standard allows developers to submit the permit and the permitted parameters in one step or in two steps. For the sake of conciseness, we will use a single entrypoint to provide both the permit and the authorized transaction parameters.
According to the standard, the entrypoint receiving the new permits must be called permit or permit_ followed by the name of your choice. We can also choose to provide a single permit or a list of permits. We will do the latter in this tutorial.
Here is the signature of our permit entrypoint:
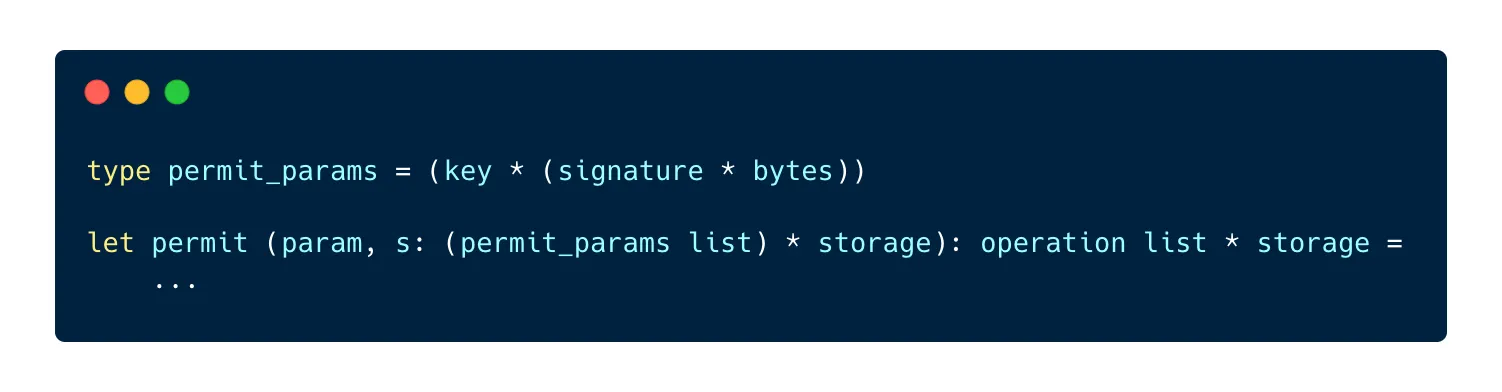
The permit entrypoint takes a list of permits. Each permit is represented by a nested pair, with the user’s key on the left and a pair on a right containing the four required parameters hashed and signed on the left and the hash of the transaction parameters on the right.
As we provide a list as the parameter of the entrypoint, the first thing to do is to loop through the elements of the list and update the storage accordingly:

We can use List.fold to loop through the list and record each permit. The function takes 3 parameters:
- A function to run for each element of the list
- The list to use
- An accumulator, i.e a value that will be modified by the current iteration of the loop and returned to be used in the next iteration
The folded function (the first parameter) takes 2 parameters:
- The accumulator
- The current element of the list
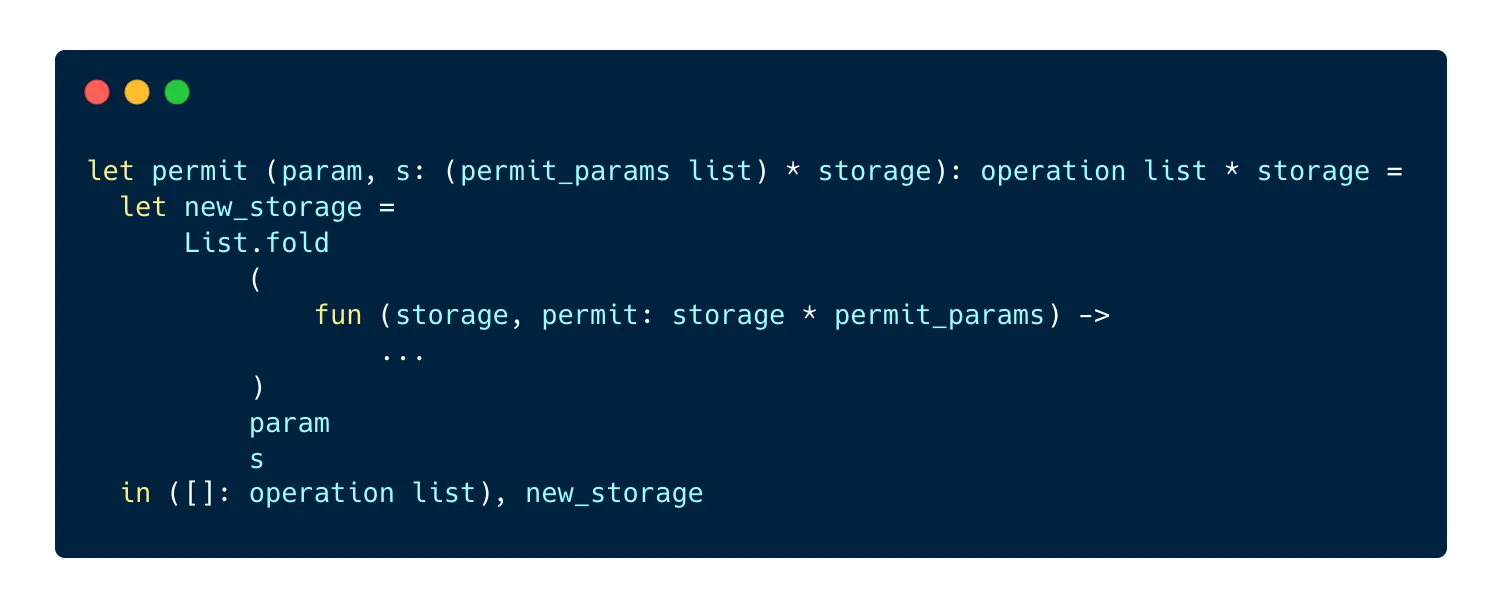
Now let’s write the folded function! Its purpose is to verify first that the permit is correct, then to verify that the permit doesn’t already exist before saving it to the permits bigmap.
In order to verify the permit, we have to pack the four required parameters ourselves in order to check them against the ones provided by the user:
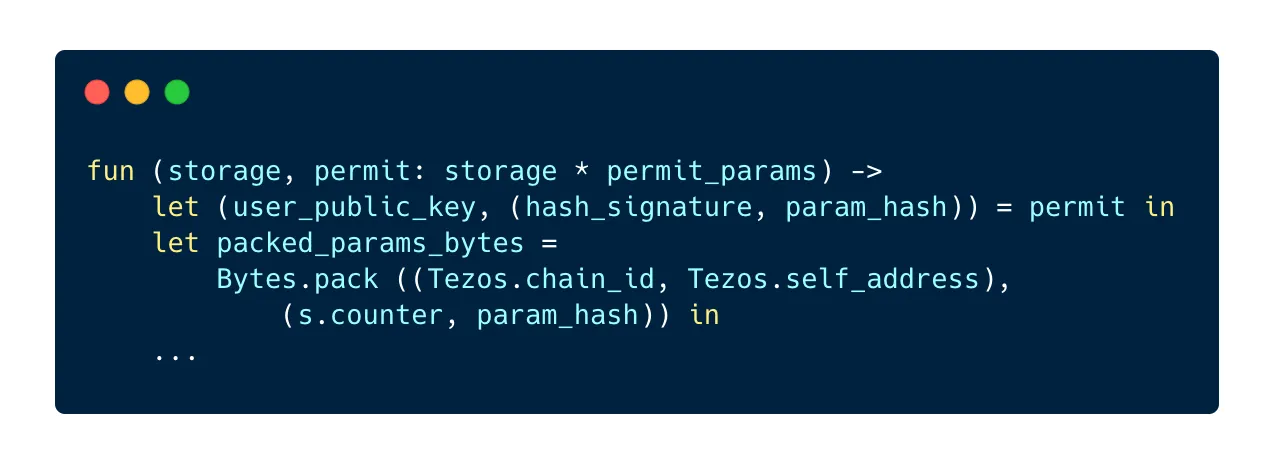
First, we destructure the permit parameters in order to isolate the user’s key, the signed parameters and the hash.
Next, we arrange the permit data as a pair of two pairs: the left pair contains the chain id and the address of the contract, the right pair contains the current counter and the hash of the authorized transaction parameters. This pair is then packed using the Bytes.pack method. Now that we have this hash, we can verify that the address that signed the provided hash is the same as the one provided in the parameters:
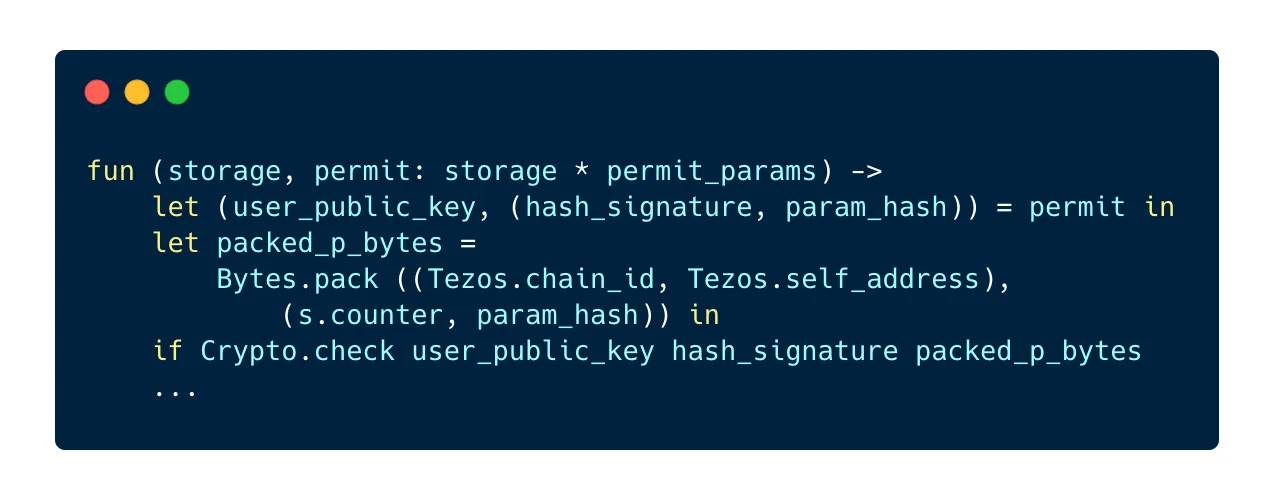
Two things can happen now:
Crypto.checkreturnstrueand we know for sure that the address associated with the permit is also the address that signed it, so everything is goodCrypto.checkreturnsfalse, which means that a different address signed the permit. If this is the case, the TZIP-17 standard indicates that we must return a specific message to the user, a pair with the codeMISSIGNEDon the left and the expected bytes on the right:
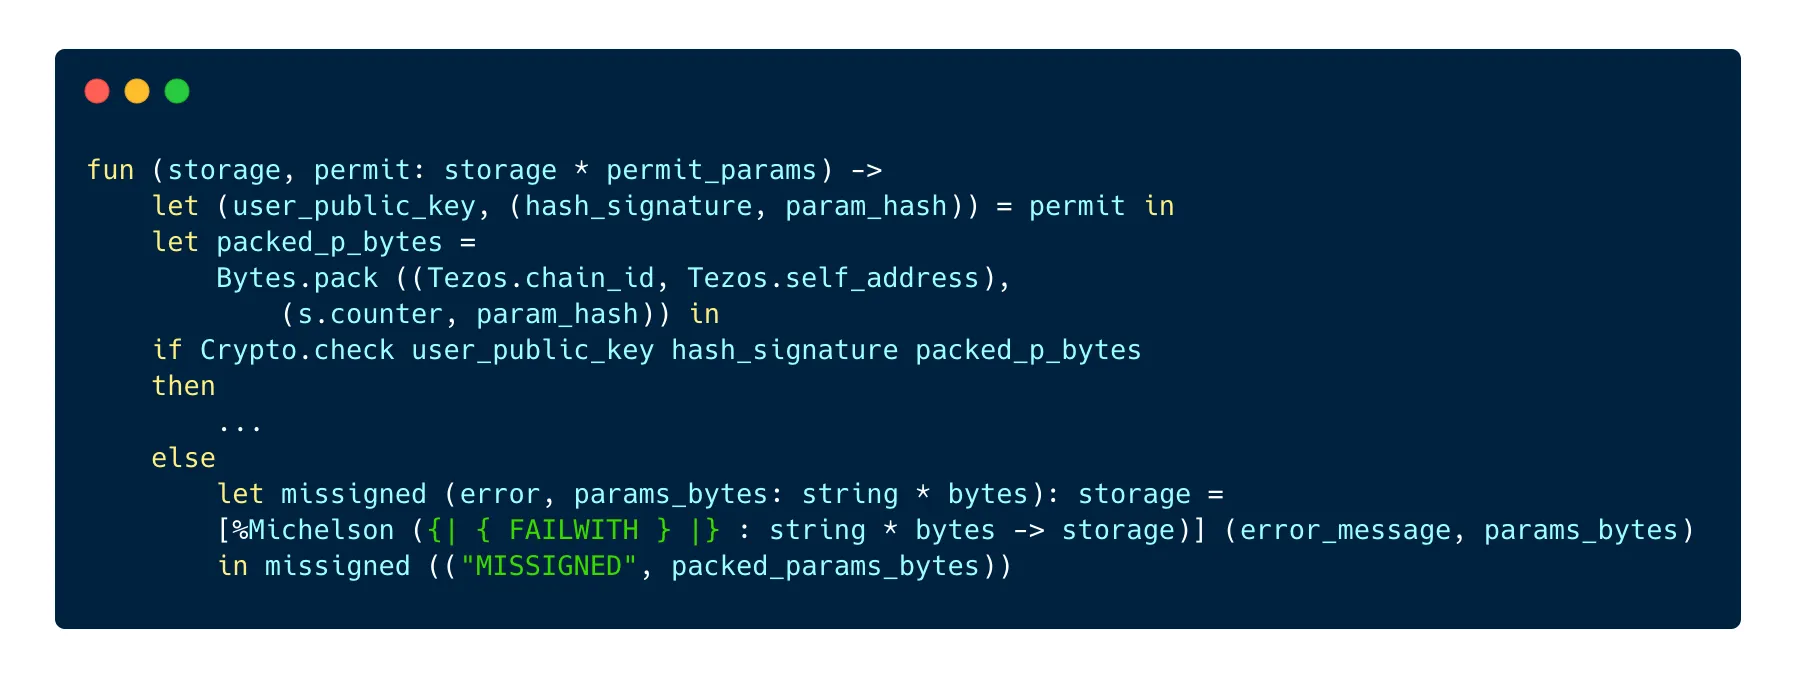
Note: at the time of writing, it is not possible to return a pair after
failwithin Ligo. However, it is possible to use Michelson code directly in Ligo, which is the case here in order to follow the standard and return the required pair.
After checking if the permit is valid, we want to check if the permit doesn’t already exist. As per the standard, we need to return a DUP_PERMIT error message if the permit has already been submitted.
First, as we store the permit in a bigmap whose keys are pairs of the type address * bytes, we must derive the address from the key provided with the permit. This can be a little tricky to do with Ligo:

We start with hashing the key to get a key_hash value. Tezos.implicit_account turns a key hash into a value of type unit contract. When we have it, we can use Tezos.address to turn it into a value of type address.
Once this is done, we can look for the permit in the permits bigmap:
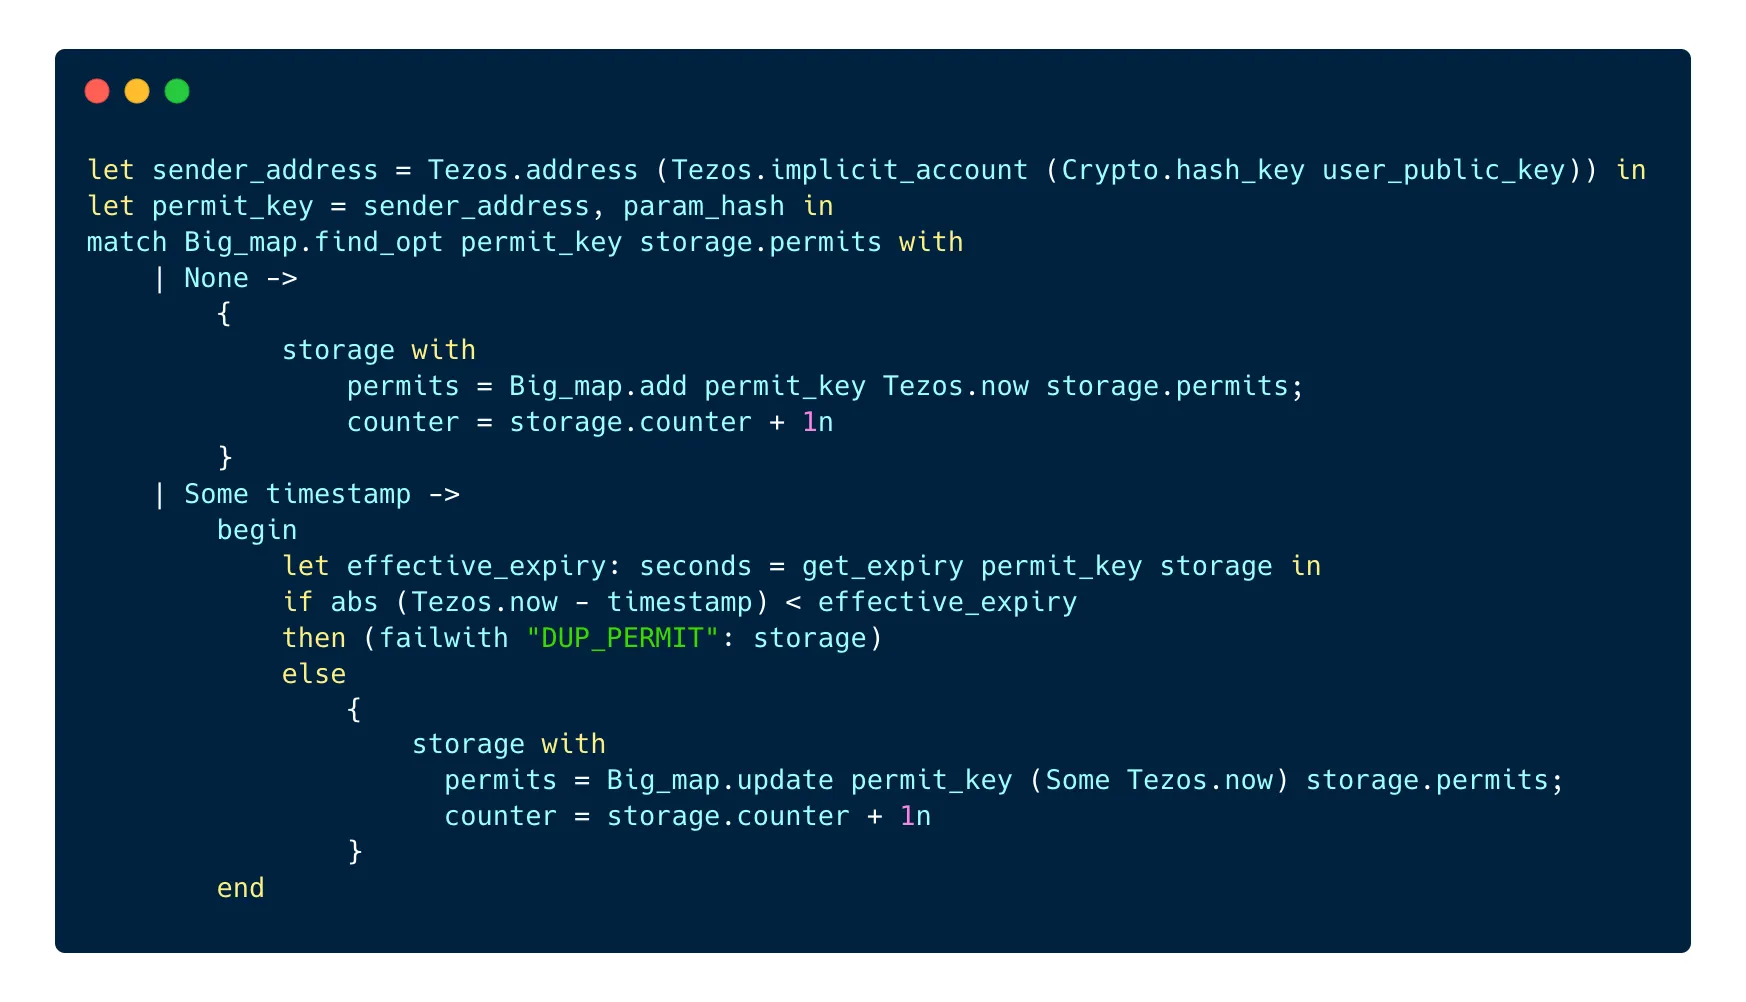
If we don’t find any permit, we can record the permit in the permits bigmap and we increase the counter in the contract by 1.
If there is already a permit recorded in the bigmap, we want to check if the permit is not expired. The TZIP-17 standard allows the users to set up their own expiry date for all their permits or for a single permit, in 2 different bigmaps. In order to make it easier to check the expiry date, we can write a little function that looks for the permit in these 2 different bigmaps:
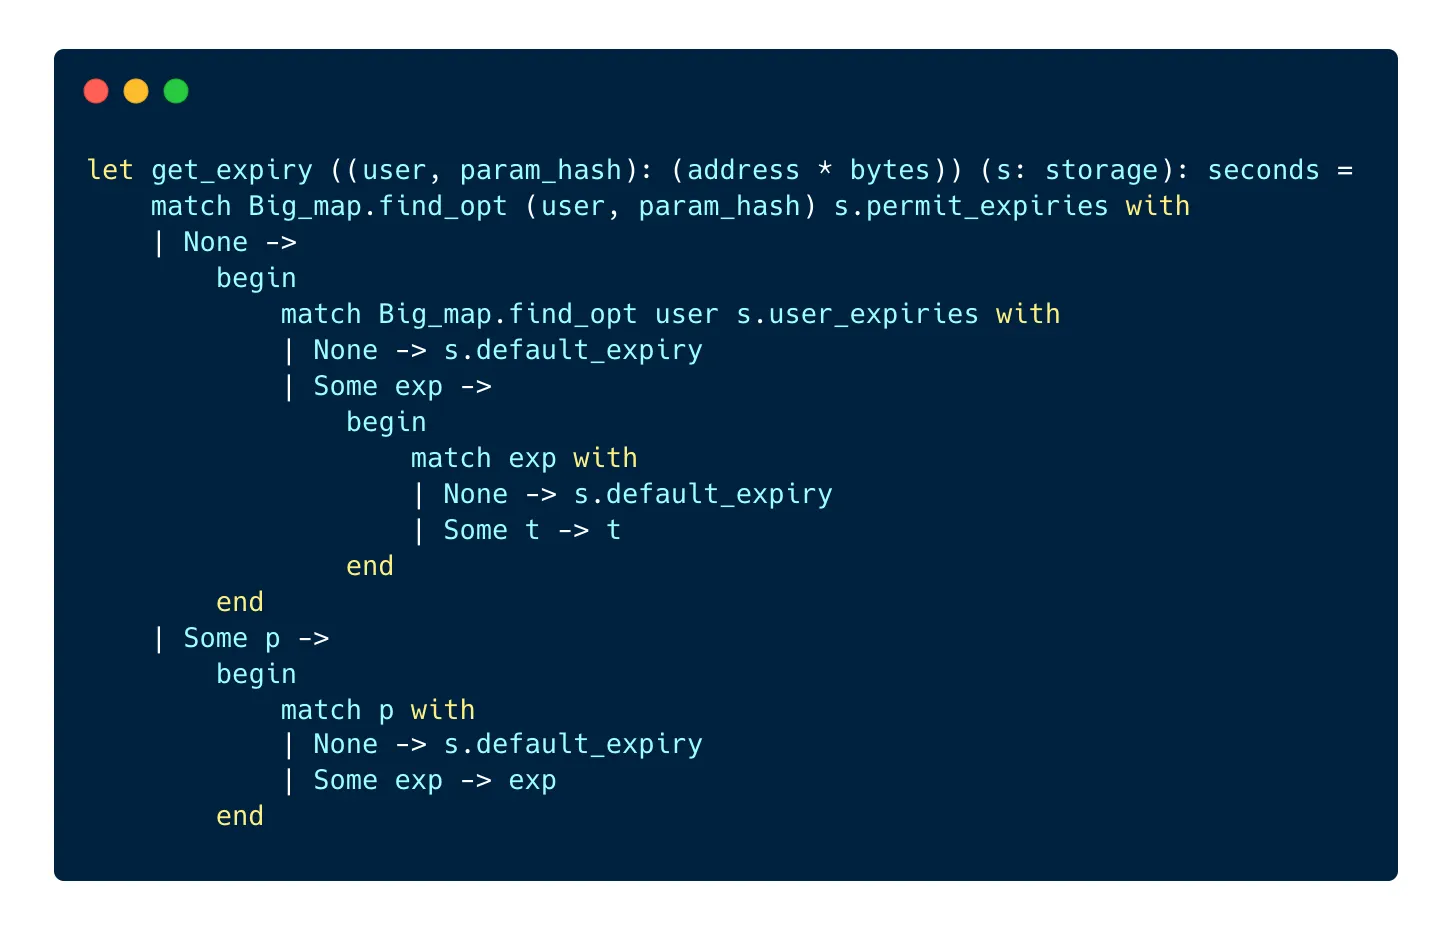
The get_expiry function looks into the permit_expiries bigmap to check if the user has a custom expiry date for this permit. If there is one, it is returned. If there isn’t, the function looks into the user_expiries bigmap and checks if the user set a custom expiry date for all their permits. If there is one, it is returned, otherwise, the default expiry date is returned.
If the permit previously saved in the contract is not expired yet, we return a DUP_PERMIT error message and make the contract fail. If the previous duplicate permit is expired, we replace the existing permit with the new one in order to extend its validity.
And that’s it, we have successfully saved a new permit in the contract 🥳 Now let’s see what happens when a transaction that matches the permit is sent to the contract.
First, we need to update the transfer entrypoint in order to check if a permit exists for the current transfer operation. We can add this line to the code of the transfer entrypoint:

We can now use the value returned by the function and stored in is_transfer_authorized to allow or forbid the transaction.
Here is what the transfer_presigned function does:
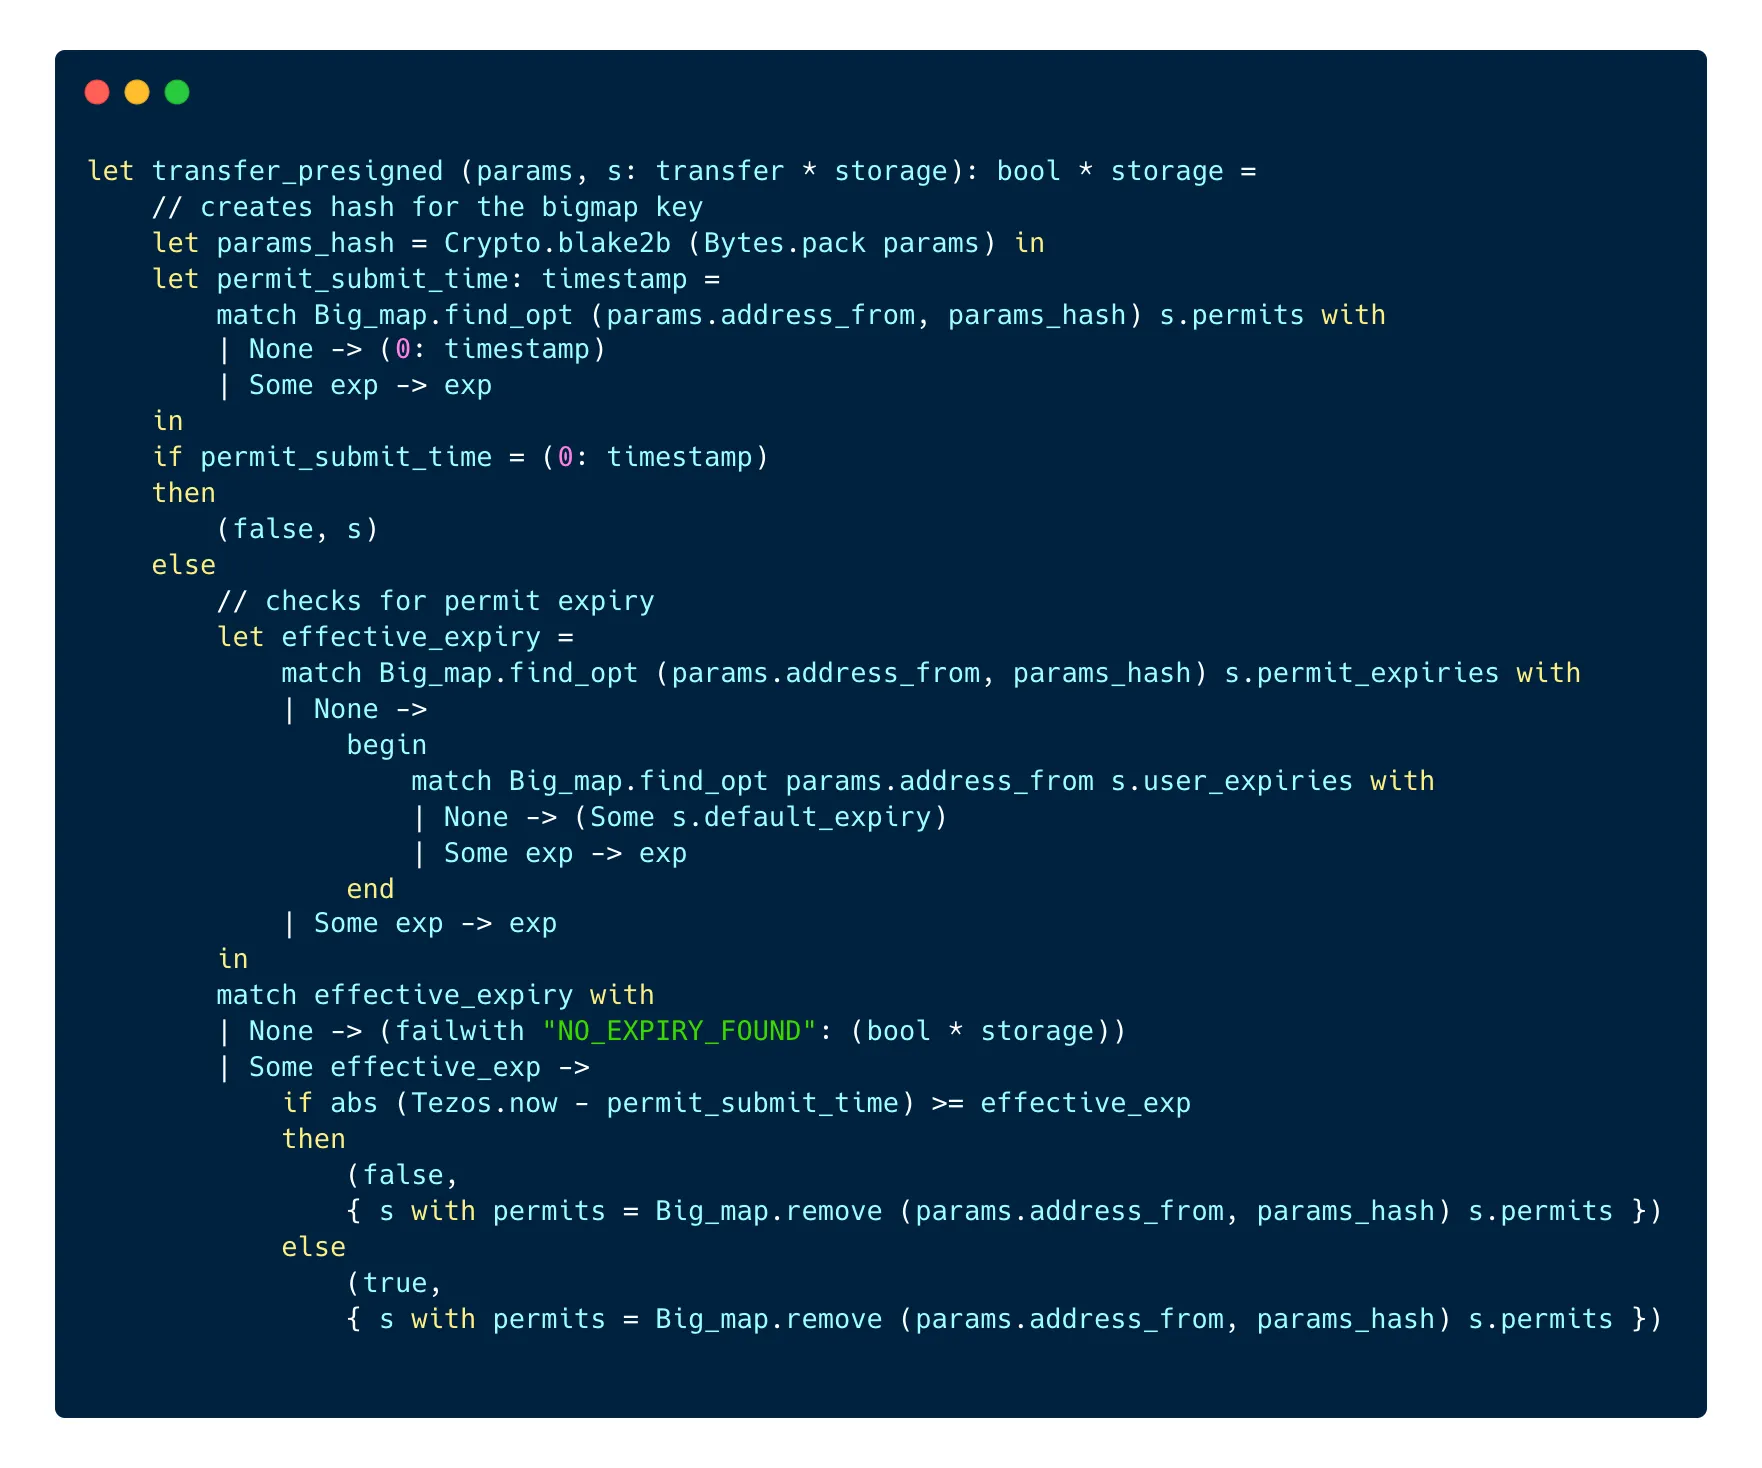
First, the function hashes the parameters of the transfer entrypoint using the Blake2B algorithm in order to get the hash that it uses in the next line to find the permit in the permits bigmap.
Then, it checks for the timestamp recorded with the permit. If no permit was found, a timestamp with a value of 0 is returned, so we check for the value of the timestamp. If there is a timestamp that’s not equal to 0, we verify that the permit is not expired and we look first into permit_expiries before looking into user_expiries in case there is no expiry set in the first bigmap.
If no expiry date is found at all, the operation fails with a NO_EXPIRY_FOUND error message. If one is found, the function returns true and the permit is consumed, i.e it is deleted from the permits bigmap.
After this is checked, the transfer entrypoint can use these values to determine if the operation can continue or should fail.
Implementation in TypeScript with Taquito
Permits are a feature of smart contracts on Tezos, so it is not possible to use them in JavaScript or TypeScript, but you can create and format a permit on the front-end before sending it to a contract that implements TZIP-17. However, formatting a permit correctly before sending it to a contract in order to have it recorded can be a little tricky.
While the Taquito team is working on a TZIP-17 package to make this process easier, you can create a permit in TypeScript with Taquito before including it in a transaction.
Note: the following code assumes you set up an instance of the Taquito
[TezosToolkit](https://tezostaquito.io/typedoc/classes/_taquito_taquito.tezostoolkit.html)to interact with the network of your choice.
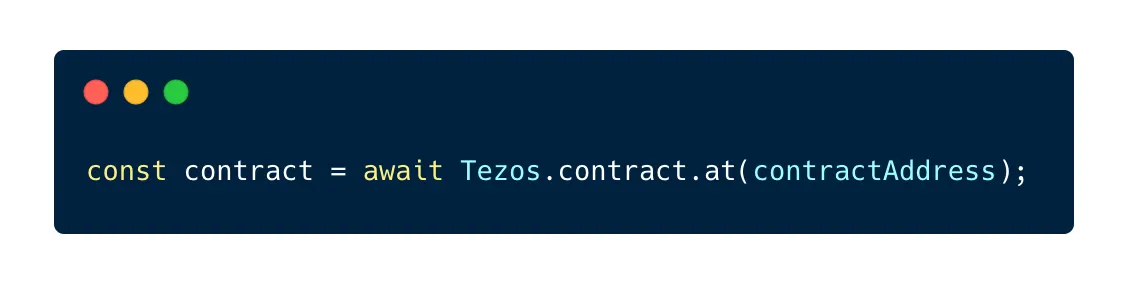
First, we need to create a contract abstraction for the contract that will receive our transaction with a permit:
After that, we need the value and the type for the parameters of the transfer:
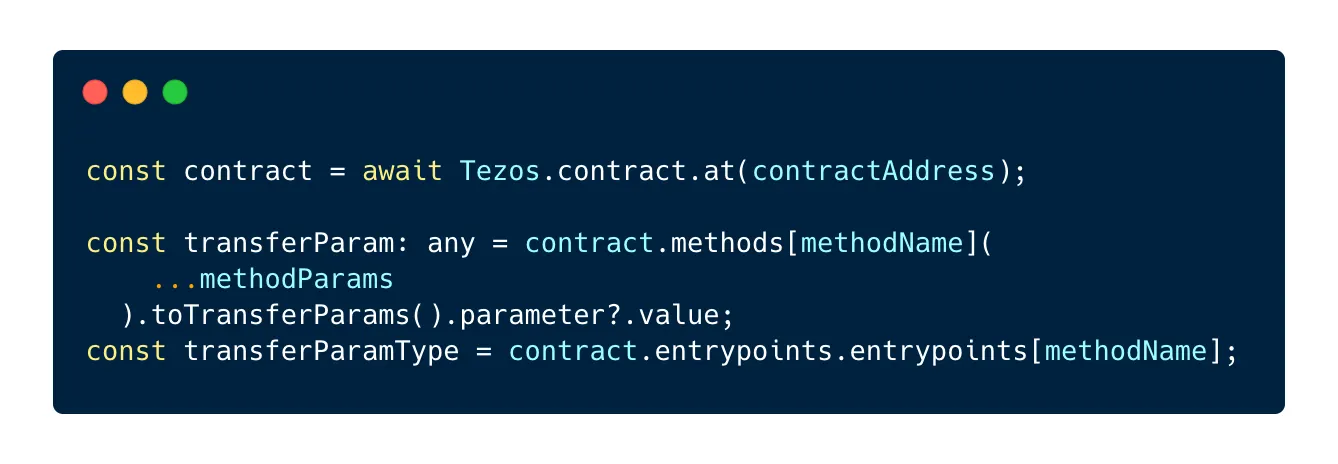
In this example, methodName equals "transfer” but you can replace it with the name of the entrypoint targetted by the operation.
Next, we need to pack the parameters of the entrypoint call using the packData method available on the rpc method of the TezosToolkit:
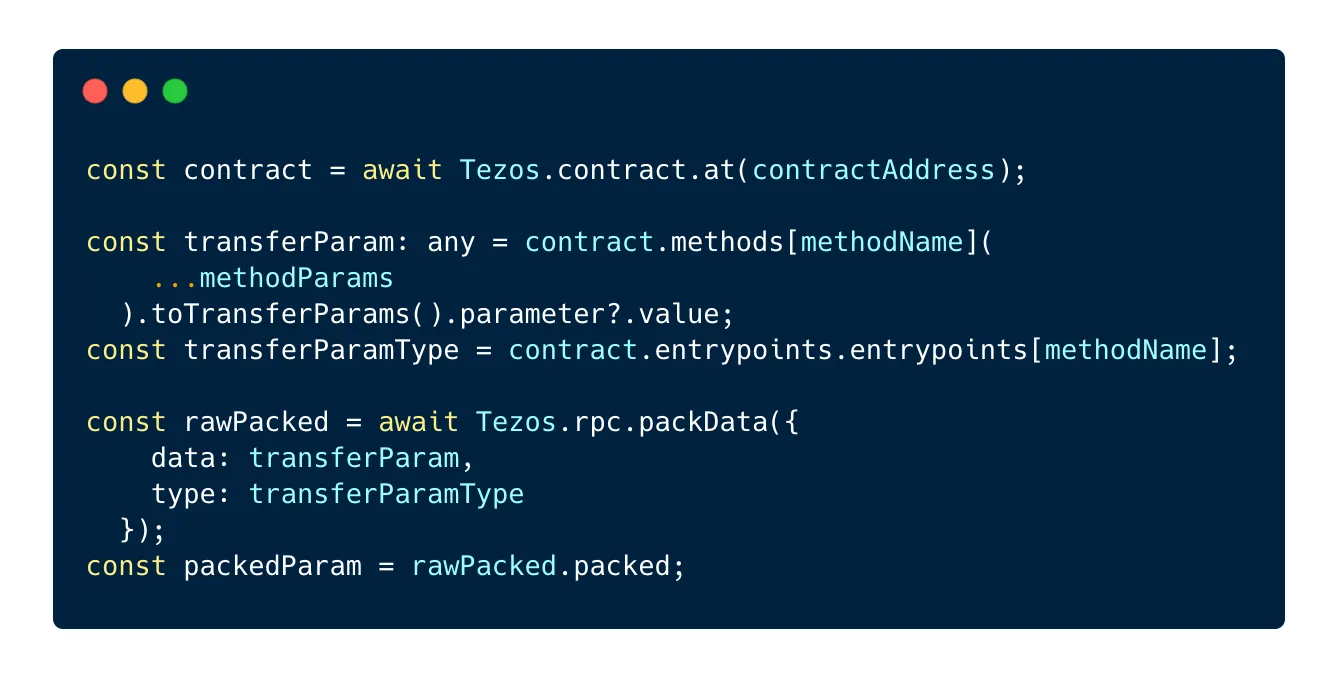
Once packed, we need to hash the packed parameters using the Blake2B algorithm:
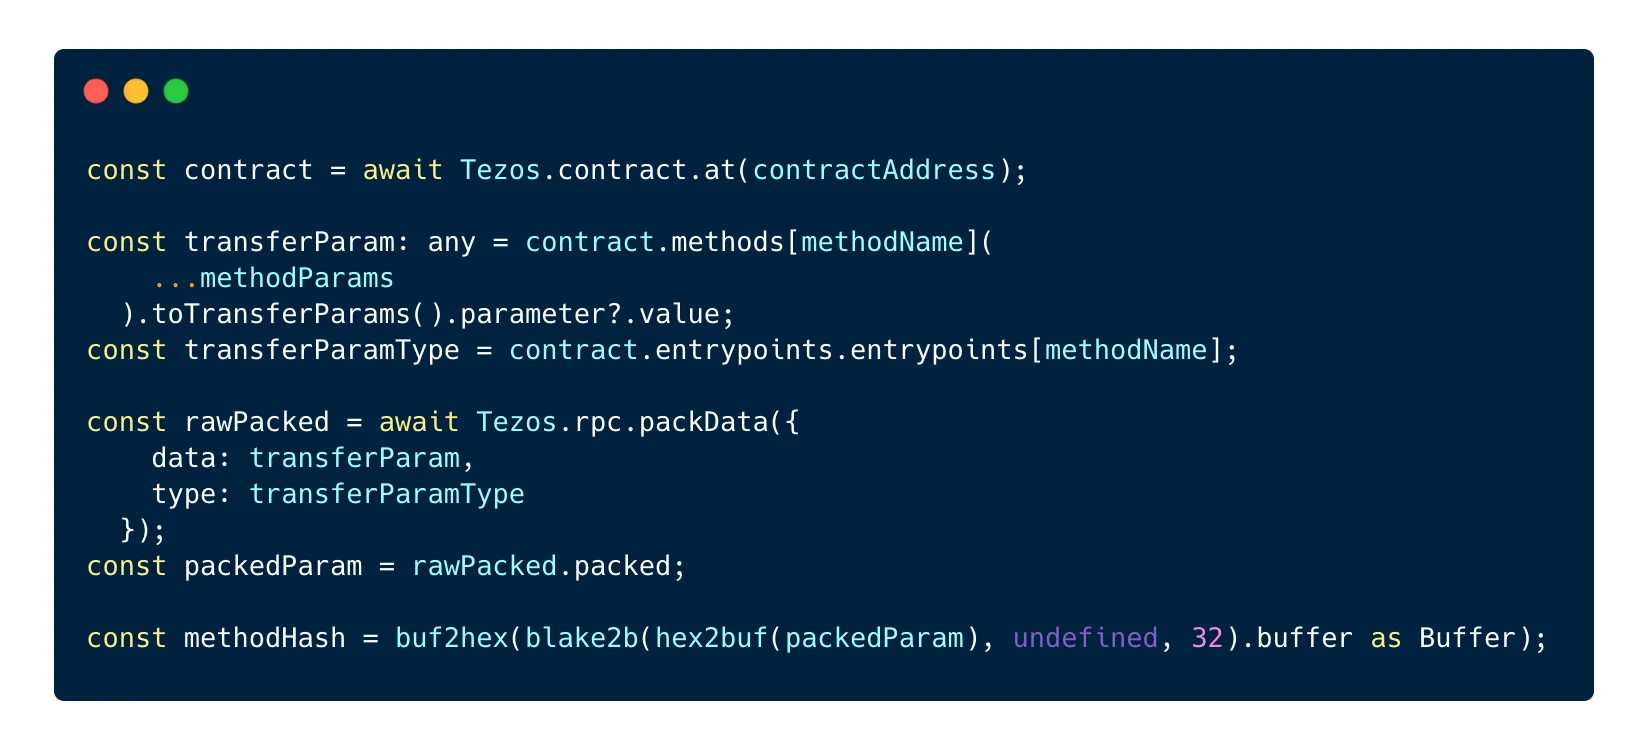
This step requires the use of the blake2b package as well as 2 methods from the @taquito/utils package: buf2hex and hex2buf.
Now we have the hash that we can use for our permit, we just need to add it to the 3 other parameters needed to record the permit: the chain id, the contract address and the contract counter. These details will then be packed and signed:
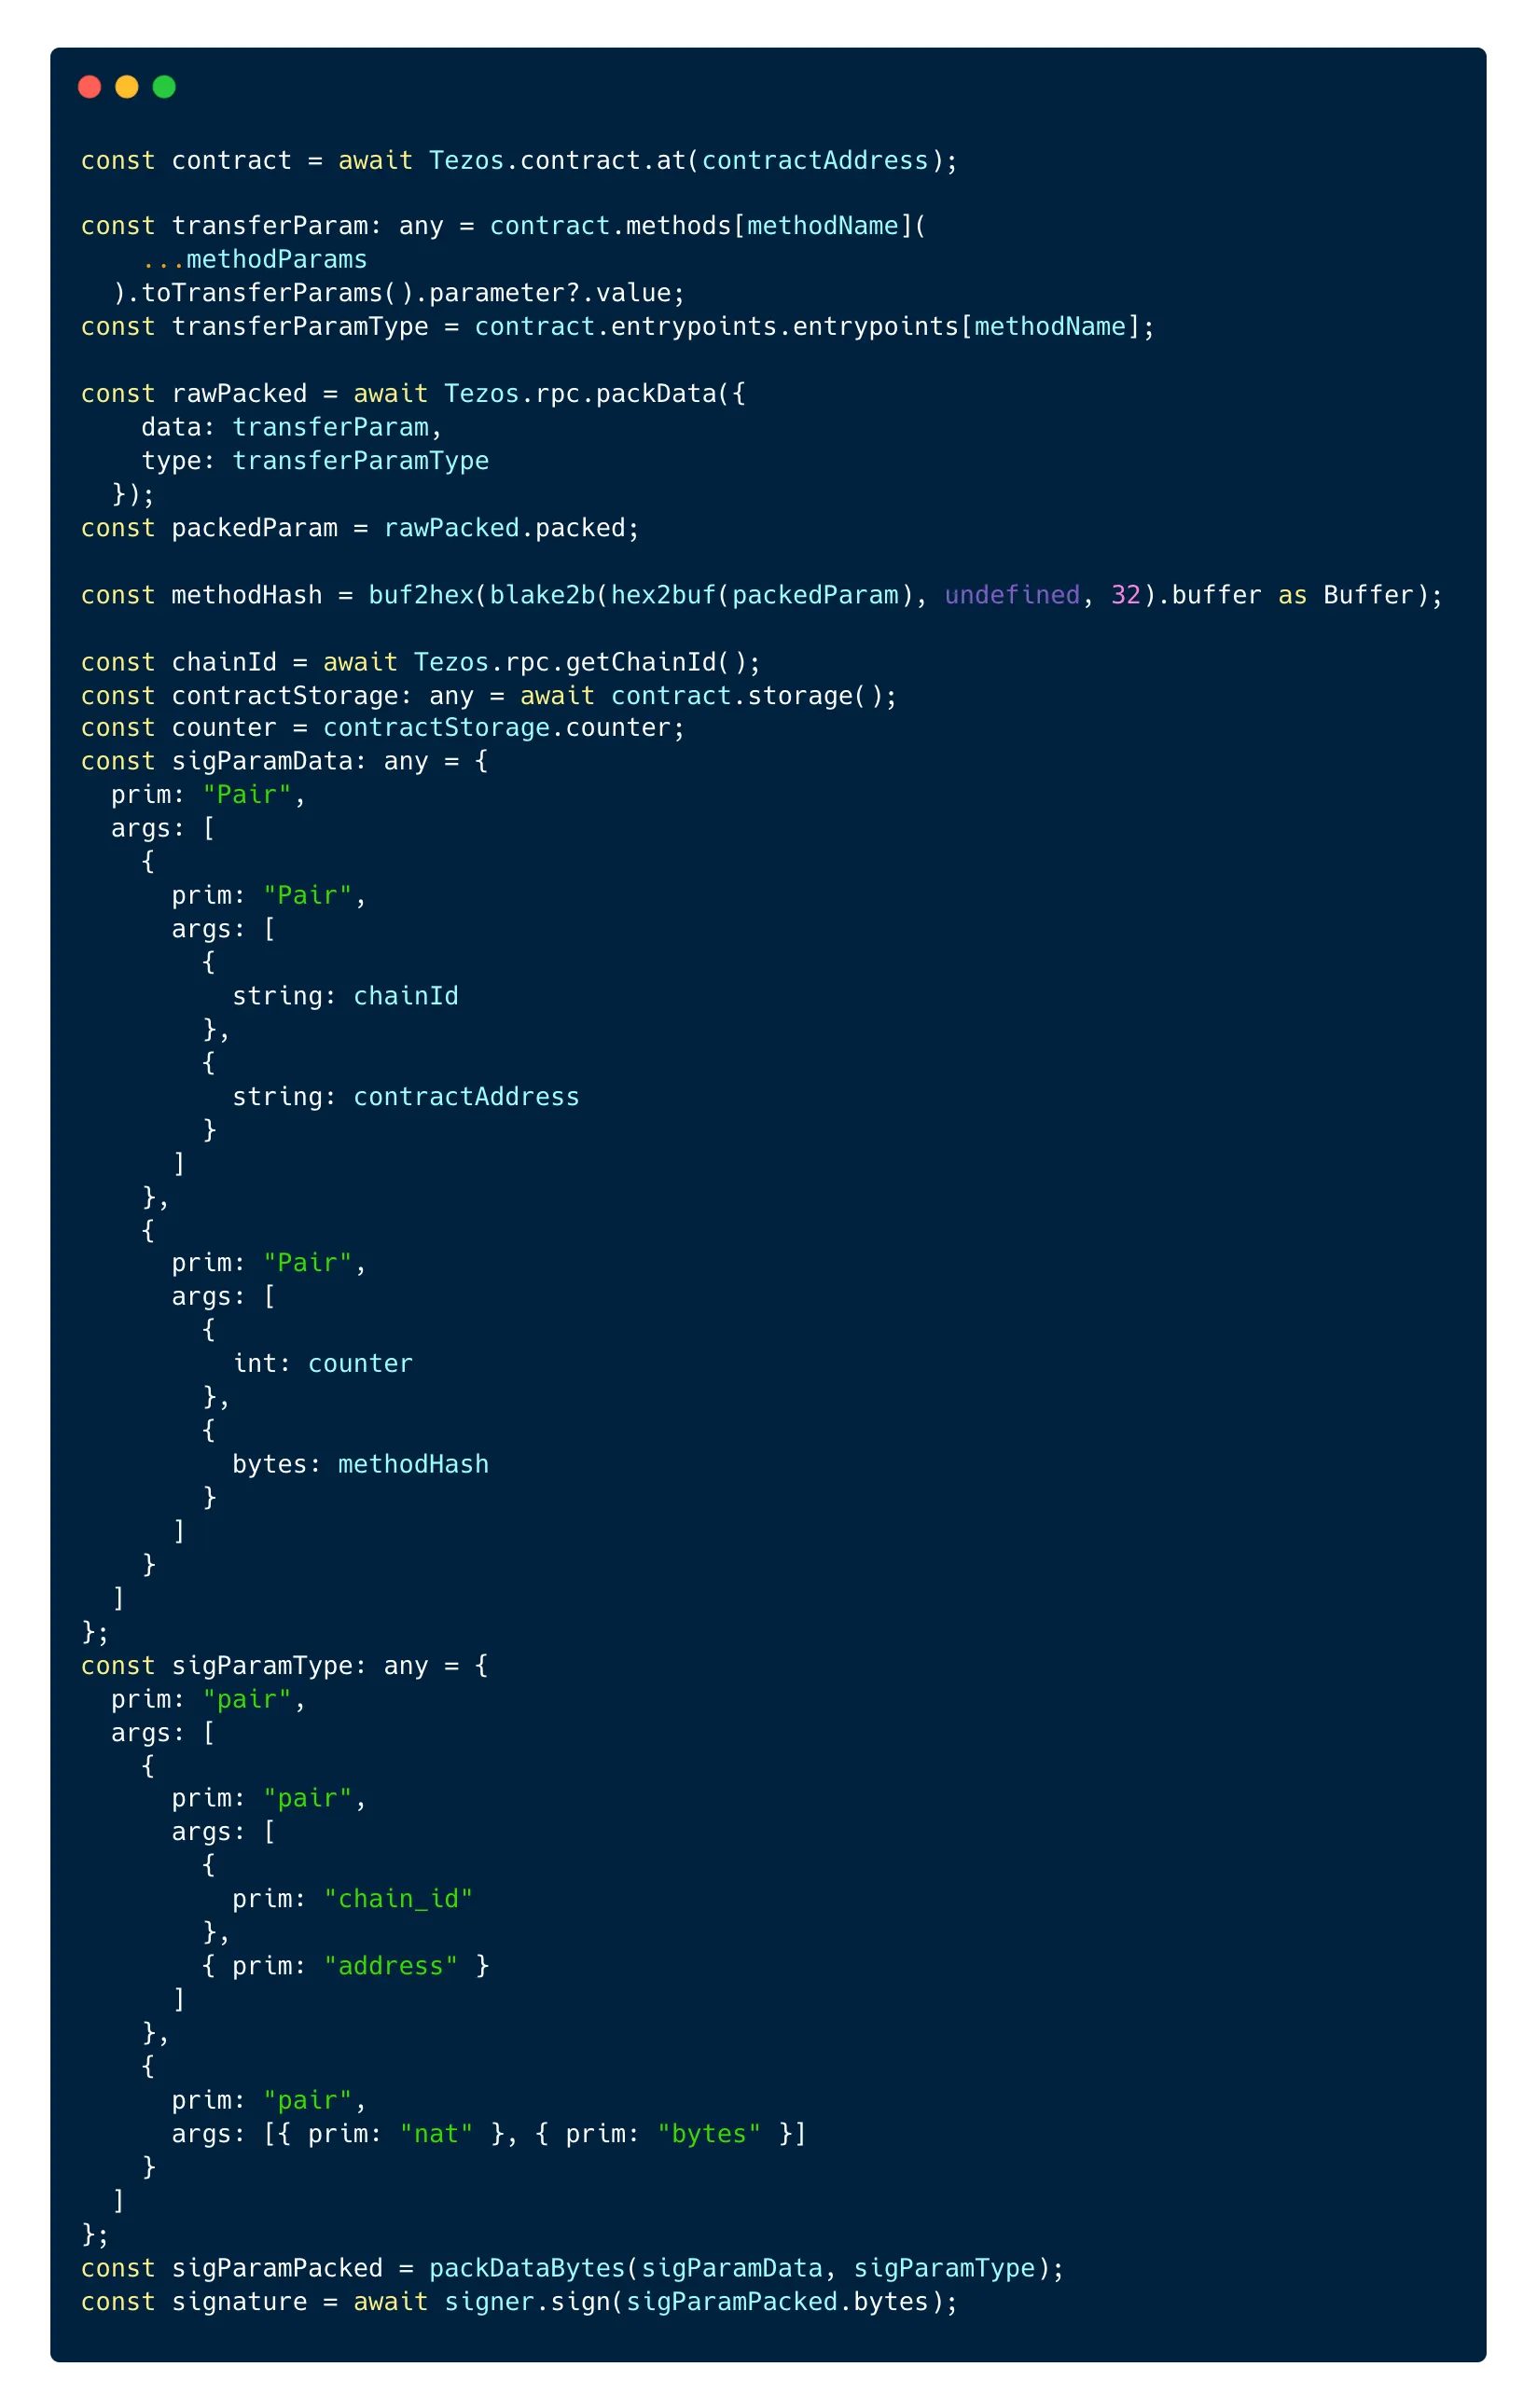
We provide the parameters in a pair and its type to the packDataBytes method from the @taquito/michel-codec package. This returns bytes that you can then sign with the signer of your choice (InMemorySigner or a wallet).
Now you have all the data necessary to forge a transaction and send the permit to the contract!
Conclusion
TZIP-17 allows more complex safety measures at the contract level, which in turn allows more complex interactions with smart contracts on the Tezos blockchain. The parameters included in the permit data (the chain id, the contract address and a counter present in the contract) ensure the safety of the permits and prevent, among other things, duplicated permits or the use of permits already consumed.
The main benefit of permits over other features implemented by different standards like TZIP-7 or TZIP-12 is that permits allow users to authorize complete transactions, rather than individual parameters of transactions. Permits can also be added to any entrypoint of a contract to allow specific transactions sent to this entrypoint.
Although TZIP-17 includes strict rules about the creation of permits, it maintains a certain flexibility as to what feature the permit allows and for how long. Users of permits can set expiry dates for specific permits or all permits they issue. This also makes permits a safety feature that is rigid against potential malicious actors, but flexible for the permit issuers.